아래 목록을 검색해서 필요한 부분만 검색해서 사용을 하면 될 것 같다.
- 1. 행간격 조절
- 2. 좌측 여백 설정
- 3. 텍스트 정렬
1. 행간격 조절
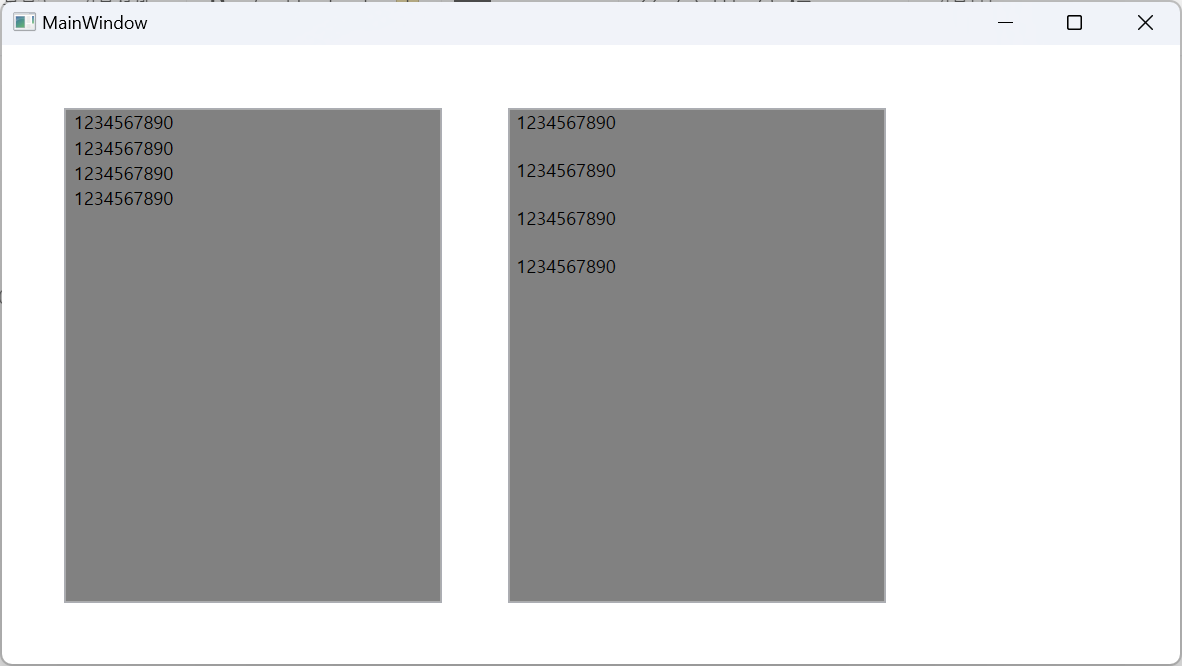
좌측의 RichTextBox는 행간격 조절을 추가하였고 RichTextBox는 기본 상태로 사용을 하였다. 우측이 지나치게 행간격이 넓은 것으로 보인다. 아래와 같이 코드를 추가해 주면 행간격이 조절이 된다.
|
1
2
3
4
5
6
7
8
9
10
11
12
13
14
15
16
17
18
19
20
21
22
23
24
25
26
27
28
29
30
31
|
<Window x:Class="WpfApp1.MainWindow"
xmlns="http://schemas.microsoft.com/winfx/2006/xaml/presentation"
xmlns:x="http://schemas.microsoft.com/winfx/2006/xaml"
xmlns:d="http://schemas.microsoft.com/expression/blend/2008"
xmlns:mc="http://schemas.openxmlformats.org/markup-compatibility/2006"
xmlns:local="clr-namespace:WpfApp1"
mc:Ignorable="d"
Title="MainWindow" Height="450" Width="800">
<Grid HorizontalAlignment="Left" Width="800">
<RichTextBox x:Name ="TestRtb" Margin="41,42,507,41" Background="#FF818181">
<RichTextBox.Resources>
<Style TargetType="{x:Type Paragraph}">
<Setter Property="LineHeight" Value="100"/>
</Style>
</RichTextBox.Resources>
<FlowDocument>
<Paragraph LineHeight="1pt" LineStackingStrategy="MaxHeight">
<Run Text="" TextOptions.TextFormattingMode="Ideal"/>
</Paragraph>
</FlowDocument>
</RichTextBox>
<RichTextBox x:Name ="Test2Rtb" Margin="337,42,211,41" Background="#FF818181">
<FlowDocument>
<Paragraph>
<Run Text=""/>
</Paragraph>
</FlowDocument>
</RichTextBox>
</Grid>
</Window>
|
행간격 조절은 아래와 같은 방법이 있다.
"Method 1"
<Setter Property="LineHeight" Value="100"/>에서 "100"의 값을 조절하면 행간의 간격이 바뀐다. 이는 Paragraph 요소의 행 높이를 "100"로 설정했다는 뜻이다. 1로 하면 좌측처럼 설정이 되는 것이다. 그런데 100으로 설정을 했지만 간격이 좁은 상태를 유지하는 이유는 <FlowDocument>에 설정된 값이 우선순위에 있기 때문이다.
"Method 2"
<Paragraph LineHeight="1pt" LineStackingStrategy="MaxHeight">에서 LineHeight="1pt" 의 값을 조절하면 행간 간격이 바뀐다.
"Method 3"
|
1
2
3
4
5
6
7
8
9
|
FlowDocument flowDocument = new FlowDocument();
Paragraph paragraph = new Paragraph();
// 행간격 조절
paragraph.LineHeight = 10;
// FlowDocument에 Paragraph 추가 및 FlowDocument 설정
flowDocument.Blocks.Add(paragraph);
TestRtb.Document = flowDocument;
|
paragraph.LineHeight = 10;
코드를 추가하여 위에와 같이 LineHeight를 변경하면 된다.
2. 좌측 여백 설정
|
1
2
3
4
5
6
7
8
9
10
11
12
13
14
15
16
17
18
19
20
21
22
23
24
25
26
27
28
29
30
31
|
<Window x:Class="WpfApp1.MainWindow"
xmlns="http://schemas.microsoft.com/winfx/2006/xaml/presentation"
xmlns:x="http://schemas.microsoft.com/winfx/2006/xaml"
xmlns:d="http://schemas.microsoft.com/expression/blend/2008"
xmlns:mc="http://schemas.openxmlformats.org/markup-compatibility/2006"
xmlns:local="clr-namespace:WpfApp1"
mc:Ignorable="d"
Title="MainWindow" Height="450" Width="800">
<Grid HorizontalAlignment="Left" Width="800">
<RichTextBox x:Name ="TestRtb" Margin="41,42,507,41" Padding="50,0,0,0" Background="#FF818181">
<RichTextBox.Resources>
<Style TargetType="{x:Type Paragraph}">
<Setter Property="LineHeight" Value="1"/>
</Style>
</RichTextBox.Resources>
<FlowDocument>
<Paragraph LineHeight="1pt" LineStackingStrategy="MaxHeight">
<Run Text="" TextOptions.TextFormattingMode="Ideal"/>
</Paragraph>
</FlowDocument>
</RichTextBox>
<RichTextBox x:Name ="Test2Rtb" Margin="337,42,211,41" Background="#FF818181">
<FlowDocument>
<Paragraph>
<Run Text=""/>
</Paragraph>
</FlowDocument>
</RichTextBox>
</Grid>
</Window>
|
cs |
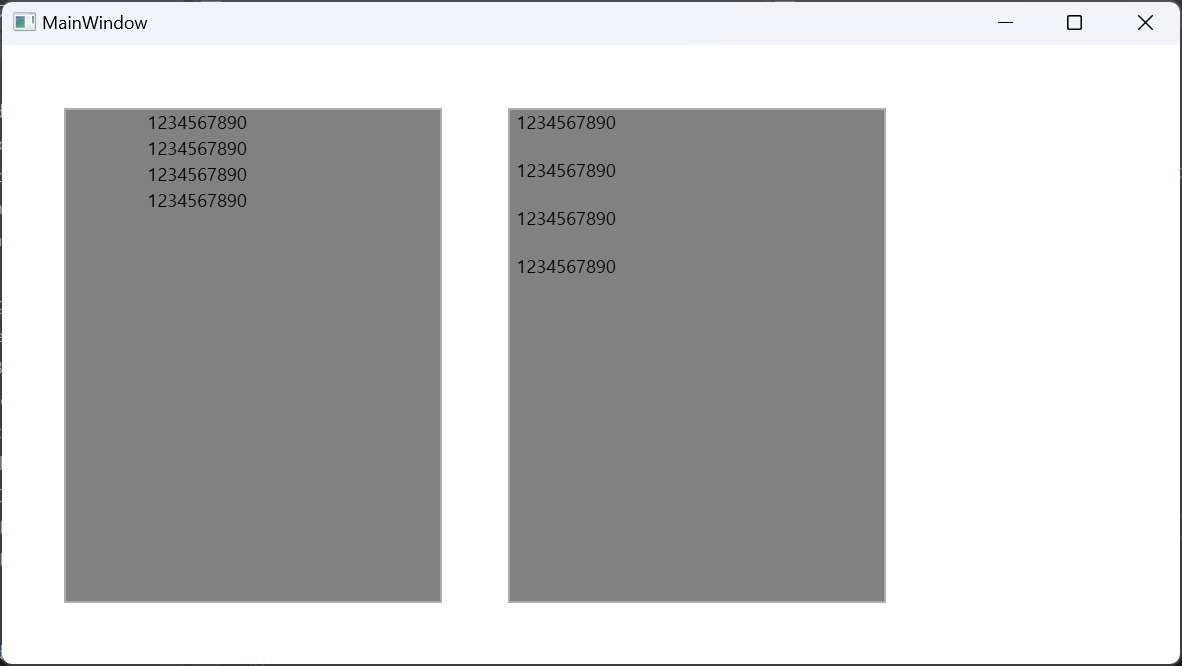
<RichTextBox x:Name ="TestRtb" Margin="41,42,507,41" Padding="50,0,0,0" Background="#FF818181">에서 Padding="50,0,0,0" 의 값만 조절을 하면 된다.
public Thickness(double left, double top, double right, double bottom)
순서대로 좌측, 상단, 우측, 하단의 여백을 수정할 수 있다. left의 param을 50으로 조절을 하여 좌측 여백 조정을 하였다.
3. 텍스트 정렬
|
1
2
3
4
5
6
7
8
9
10
11
12
13
14
15
16
17
18
19
20
|
<Window x:Class="WpfApp1.MainWindow"
xmlns="http://schemas.microsoft.com/winfx/2006/xaml/presentation"
xmlns:x="http://schemas.microsoft.com/winfx/2006/xaml"
xmlns:d="http://schemas.microsoft.com/expression/blend/2008"
xmlns:mc="http://schemas.openxmlformats.org/markup-compatibility/2006"
xmlns:local="clr-namespace:WpfApp1"
mc:Ignorable="d"
Title="MainWindow" Height="450" Width="800">
<Grid HorizontalAlignment="Left" Width="800">
<RichTextBox x:Name="TestRtb" Margin="122,42,478,41" Background="#FF818181" Height="351" Width="200">
<FlowDocument>
<Paragraph TextAlignment="Center">
Text
</Paragraph>
</FlowDocument>
</RichTextBox>
<RichTextBox x:Name="Test2Rtb" Margin="357,42,191,0" Background="#FF818181" Height="351" Width ="200" VerticalAlignment="Top" ></RichTextBox>
</Grid>
</Window>
|
cs |

"Method 1"
<FlowDocument>
<Paragraph TextAlignment="Center">
Text
</Paragraph>
</FlowDocument>
위에 부분 처럼 요소를 추가해 주면 정렬이 된다.
"Method 2"
|
1
2
3
4
5
6
7
8
9
10
|
FlowDocument flowDocument = new FlowDocument();
Paragraph paragraph = new Paragraph();
paragraph.TextAlignment = TextAlignment.Center;
paragraph.Inlines.Add(new Run("1234567890\n"));
paragraph.Inlines.Add(new Run("1234567890\n"));
paragraph.Inlines.Add(new Run("1234567890\n"));
paragraph.Inlines.Add(new Run("1234567890\n"));
TestRtb.Document.Blocks.Add(paragraph);
|
cs |
Code-behind 파일에선 위에와 같이 수정하여 정렬이 가능하다.

'프로그래밍' 카테고리의 다른 글
| uuid v4 랜덤 기반 UUID의 정의 구성 및 예제 코드 (2) | 2025.02.13 |
|---|---|
| cdecl과 stdcall의 차이점 __cdecl과 __stdcall 비교 (1) | 2024.01.09 |
| [엑셀 코딩] MIDB 사용 방법 및 파서 만들기 (0) | 2022.11.13 |
| [VSCode] 로그 파일 설정 및 Log File Highlighter 사용법 (0) | 2021.09.26 |
| tortoise svn lock 해제 update 매크로 (0) | 2020.01.20 |